Monday, March 9, 2009

Waffles!


This is actually one of Marguerite's recipes, but I enjoy it so much that I thought I'd post about it. I believe the original recipe came with my grandma's (Marguerite's mom) waffle iron years ago. Marguerite doctored it up a bit to make it even tastier. Here's what you need if you wish to make these yummy waffles at your house:


1 1/4 cup flour (we use unbleached, but any white flour other than self-rising should work)
1 tsp. +/- cornmeal (optional--makes the waffles a little crispier)
2 tsp. baking powder
1/4 tsp. salt
1 tablespoon sugar
1 egg (we use white eggs, but I'm sure brown would also do the trick; we've never tried this with egg substitutes, but I don't see why you couldn't)
1 cup milk (we use whole milk)
1/4 cup oil (I like canola because it doesn't have an overpowering flavor)
1/2 tsp. vanilla (Marguerite likes to go easy on the vanilla because it is kind of pricey, but I think a whole teaspoon adds a little something)
Powdered (confectioner's) sugar (optional)

Combine the dry ingredients in a bowl and set aside; crack the egg into another bowl and beat it with a fork or spoon; add milk and oil to beaten egg; stir; stir in flour mixture; add vanilla last (for stronger vanilla flavor); bake in waffle iron according to iron's directions (ours clicks when the waffle is done, but yours may differ). Sprinkle powdered sugar or top, if desired (I think it tastes just like a funnel cake, only healthier, with the powdered sugar), or add waffle toppings of your choice. Makes approximately four round waffles in a standard waffle iron.

Sunday, March 1, 2009

For the Love of Pad Thai

As you know it all started with my love of Thai food—how to replicate the dishes I so loved. Chief among these was Pad Thai. It was a mystery. When I realized the recipe in my Thai cookbook didn’t come close to approximating the dish we were served at our local Thai restaurant I almost gave up hope. A search of the internet turned up nothing at the time, but I found a noodle recipe that came close, and for about a year, we made do with it. Delicious though it was however, it was not Pad Thai.


One day while visiting a large Asian food store, I happened upon a jar of Pad Thai sauce. Hallelujah! Of course, there were about six different versions to choose from—all expensive—so I chose two and went home to experiment. The results as you might expect, were mediocre at best, but it was better than nothing. Consequently, we would have Pad Thai only as often as I got to the Asian market to stock up, which was infrequently.


This is where I would probably still be if not for my Thai sister-in-law May. Her recipe for Pad Thai was simple and easy to make. It had the added benefit of not having a bunch of fancy ingredients that would be hard to come by and the recipe tasted like what I had come to expect of Pad Thai. I was delighted. While this recipe bears little resemblance to the street food so common in her homeland, I think you will find it a supreme comfort food.


A word about creativity: Noodle dishes in most Asian cultures are incredibly versatile. They take the “kitchen sink” approach, using whatever happens to be fresh and on hand. With that in mind, feel free to experiment with ingredients that go beyond those listed here. Street Pad Thai often includes tofu, soybeans, egg, bean sprouts, chives, red pork, fresh or dried shrimp, salted radish, carrots, scallions, lime, peanuts, pickled turnip, garlic, tamarind, and dried chili. We’ve also used crab with good results. Bottom line, be creative. I also wanted to include a very nice YouTube video of street Pad Thai which you will find here.


Auntie May’s Pad Thai


First, we make the sauce—much better than the expensive jarred version.
I usually make a double batch and then keep it handy in a quart jar ready for use in the pantry. This recipe makes about 1½ C of sauce which is enough for one package of noodles—it generously serves four and does not need refrigeration.


Sauce:
½ C Brown Sugar
½ C White Sugar
½ C Seasoned Gourmet Rice Vinegar
½ C Water
1 tsp Fish Sauce
¼ tsp salt


Place all of the above ingredients in a small sauce pan and cook until it comes to a boil and all the sugar dissolves. Set aside.

1 package of Rice Stick noodles.


Rice noodles usually come in packages of 14-16 ounces and a variety of widths. We like the wider noodle (about 5 mm) but any rice stick noodle will do. Soak the noodles in cold water for 1-3 hours if you can. Soaking in cold water will give you a nice, non-sticky noodle. (You can soak them for about ten minutes in hot water just prior to using but they will be sticky and you will have to watch that they don’t get too soft or they will turn to mush in your wok.)


Other ingredients:

2-4 Tbs Peanut or Canola Oil
4 Eggs
2 Boneless, Skinless Chicken Breasts, diced
1 16 oz. can Chicken Broth
1 bunch Scallions-julienne into 1” pieces
1-2 C Bean Sprouts
Peanuts, roasted, ground
1 Lime, Cut into Wedges
Crushed red pepper flakes or Thai chili powder

Now to the cooking…we make Pad Thai in two batches.

Heat your wok or large non-stick skillet to high. Add 1-2 Tbs of oil and heat until it shimmers. Add two eggs to the oil and scramble quickly, add diced chicken (1 breast) and cook for about 2-3 minutes. (Chicken will not be fully cooked.)

Next, add half of your presoaked rice noodles, ¾ C sauce, and 1 cup Chicken Broth to wok. Stir-fry until your noodles are soft and the liquid is absorbed. (About 6-10 minutes depending upon the intensity of your heat source and thickness of your noodle. If all the liquid is gone before your noodles are completely cooked, add more Chicken Broth or water.)

About 30 seconds before your noodles are done (taste them to see), add the scallions and bean sprouts, stir to mix and wilt the scallions.

Serve immediately.

Garnish with roasted peanuts, lime wedges, and Thai chili powder to taste.

Repeat process with second half of the ingredients.

Also, a note about fish sauce: In Thai cooking, fish sauce is salt...so, as you taste your noodles, if you like saltier dishes, add a splash or two of fish sauce as your Pad Thai cooks.


Friday, February 27, 2009

The Lowly Lentil

Lentil. For many this word conjures images of dry inedible vegetarian casseroles or disgusting stews. The other day my husband asked what I was making for dinner, and when I replied, “something with lentils”, he groaned. His only memories of “something lentil” are that of his grandmothers inedible ‘roast’. While I admit I have had my fair share of these inedible creations at potlucks and grandma’s house, I do not believe the lentil deserves this reputation.

The lentil is considered one of the eight first domesticated crops grown by Neolithic cultures in the Fertile Crescent and they have made up an important part of the diet of humans ever since. This ‘practically forever’ time period, may account for why there are lentil dishes in almost every culture since Adam.

The Lentil is highly nutritious with a protein content of 26%, is one of the best plant sources of iron, and is very high in fiber. It may not be pretty but it can be delicious. Here is a recipe for a hearty lentil soup that my family loves and we hope you will too. I usually make this recipe in a Crockpot or slow cooker in the morning so it is ready and waiting by dinner. Serve it with a crusty loaf of French bread, a dollop of sour cream, and freshly grated parmesan cheese on top.

Smoky Lentil Soup

3 T Olive Oil
1 lb Smokies or German style Sausages, sliced on the bias
1 C Carrots, diced
1 Onion, diced
1 C potatoes, diced
½ C Flour
1 ½ C Lentils, rinsed and picked over for stones
3 Quarts water (for added flavor, subtract 1 cup water and add 1 cup of your favorite red wine)
4 T beef base
1 tsp Nutmeg
1 tsp fresh ground pepper
2-3 Bay leaves
1 tsp Thyme

1. In a non-stick skillet over medium high heat, brown the sausage in a tablespoon of oil, then remove, and place in slow cooker. Add the onions, carrots and remaining oil to the skillet and sauté until al dente, about 5-8 minutes. Add flour to the carrots and onions and mix until it has dissolved and creates a paste-like consistency. Put in slow cooker with sausages.

2. Rinse Lentils and add to slow cooker along with the potatoes, nutmeg, pepper, bay leaves, and thyme.

3. Mix beef base with water and wine and add to slow cooker. Give it all a quick stir and you’re done. Cook until lentils are soft and soup is thickened. About 3-5 hours. For a creamy texture, puree about half the soup and remix before serving.

Tuesday, January 27, 2009

Papa's Favorite

Busy day? Company coming? Not enough time to prepare something fussy? I’ve just the recipe for you. My father and husbands favorite dessert is also a great way to use up apples that are too far mushy for snacking. It comes together in about fifteen minutes with very little prep time. Just throw the ingredients together and pop it into the oven for an hour. This leaves you plenty of time for other pleasures. Enjoy.


Fresh Apple Cake

4 Cups Apples—any variety, chopped with skins left on
2 Cups Sugar
2 Eggs
½ Cup Oil
2 tsp Vanilla
2 Cups Flour
2 tsp Soda
2 tsp Cinnamon
1 tsp Salt
1 Cup Raisins or Craisins

Streusel Topping

1 Cup Pecans—chopped fine
½ Cup Brown Sugar
2 Tbs Flour
3 Tbs Butter

Preheat oven to 350 degrees.

Mix the chopped apples together with sugar, eggs, oil, and vanilla. Set aside while you put flour, soda, cinnamon, salt and raisins in a separate bowl. Give flour mixture a quick stir with a fork. Prepare 9 x 11 baking dish by spraying it with no-stick spray. For streusel, combine chopped pecans, butter, flour and brown sugar and mix with your fingers until it is moistened and crumbly. Combine apple mixture with flour mixture. It will be very thick. Stir until flour is just moistened. Scoop into baking dish and top with streusel topping.

Bake 1 hour and serve with ice cream or whipped cream.

Thursday, January 22, 2009

Sunshine in Winter


We are in the doldrums of winter. The sun has not shown its face in countless days and the snow is hard and dirty. It is the worst time of winter when all is brown and grey and spring seems far away. The trees look bedraggled and sad. The sky outside is a monotonous amorphous white. In all this dreariness there is one thing that saves my soul from all out depression—citrus season.

I know that citrus is now available year-round but here in the Pacific Northwest, winter is the time when it most reasonably priced. We can usually pick up a box of oranges for between $12.00 and $14.00. Our boxes then end up in my favorite antidepressant…a tall glass of orange juice. When was the last time you had a glass of fresh squeezed orange juice? If you haven’t had one in a while, you may not remember that it is like drinking a glass of liquid sunshine…a pure pleasure to the soul.


Eight to ten oranges will make fresh squeezed OJ for my whole family…so it’s not as if you have to run out and buy a whole box. I’m willing to bet however, that after the first glass you’ll wish you had. If you do not have an electric juicer, they make the job easier. You don’t need an expensive one…just get a $15.00 Proctor Silex or Black & Decker at Target. Mine is a Proctor Silex and we’re on year 4 with it—juicing 4-8 30-pound boxes of citrus a winter.

Any ray of sunshine in winter is delightful. For me it is often orange juice—tart, sweet, and wholesome. There is nothing like it to give your heart a lift when winter gets you down.

Saturday, January 17, 2009

A Story of Porridge


Once upon a time, in a faraway forest, there lived three little bears. They lived in a tiny stone cottage whose roof was covered in moss and yellow daisies. Every morning, at eight a.m. sharp, Mama Bear would make breakfast for her family. There was a big bowl of porridge for Papa Bear and a medium bowl of porridge for Mama Bear and of course, a small bowl of porridge for Baby Bear.

Now for Mama Bear, no ordinary porridge would do. She did not like instant porridge or the mushy kind either. No. Only healthy organic whole grains would do for her family so every morning from the cupboard above the stove she took down a big tin of old fashioned oatmeal. In Papa Bears bowl, she placed one cup of oatmeal. In her own bowl, she placed a half cup of oatmeal, and in Baby Bear’s bowl, she put a quarter of a cup of oatmeal.

While she boiled water for the oatmeal, Mama Bear poured Papa Bear a tall glass of milk. She poured a medium sized glass of milk for herself and a very tiny glass of milk for Baby Bear who often spilled. When the water was boiling, she took it from the stove and poured it into the bowls of oatmeal until the water just barely covered the oatmeal. She then placed a salad plate over each bowl (to save saran-wrap and thus decrease her family’s carbon footprint) and allowed it to sit for five minutes before calling her bears to Breakfast.

First, in came Papa Bear who was a Grizzly with a great gruff voice and big ‘stompy’ feet. He liked bananas and brown sugar on his oatmeal. Next came Mama Bear who was a sweetheart with a big white apron and pink bunny slippers. She liked dried blueberries and slivered almonds on her oatmeal. Lastly came Baby Bear who was cute as a button in bright red footie pajamas. Baby Bear liked Strawberry jam on his oatmeal.

Now one day, while waiting for the oatmeal to cook, Mama Bear decided to run to the blueberry patch because she wanted fresh blueberries instead of dried…well, I guess you know what happened next.


Oatmeal—serves one.

½ cup Old fashioned rolled oats (not quick oats)
½ cup boiling water or enough to cover oats

Place oats in a bowl and pour in boiling water. Cover and allow to sit for approximately five minutes. Add milk and your favorite toppings for a quick nutritious breakfast.

(This is not your mother’s mushy oatmeal :) )


Photo snagged from here with many thanks!

Thursday, January 8, 2009

Tom Ka Gai Soup

The foods of foreign lands fascinate me and among my favorites are Thai dishes. I think the allure of world cuisines began early as my mother introduced us to the basics in Mexican, Chinese and Italian cooking. When I was eleven, our family adopted a little girl from Pakistan and Mom, with cookbook in hand, led us to Indian cuisine with its wonderful curry’s and flatbreads. We dabbled with Vegetarianism off and on throughout my childhood, and college brought an introduction to Greek and Japanese foods such as Gyros, Bento and Sushi.

When I was pregnant with my first child, I worked with a little Vietnamese woman who introduced me to kimche and told me that the spicy fermented vegetables she had buried in her back yard would positively bring on labor—it didn’t although at about that time, I also heard that Thai ‘spicy’ food worked much better for late babies. At any rate, I never got around to trying Thai food until a few years later when we moved to a new town that had a wonderful Thai restaurant, which we came to visit regularly. A budget crunch brought me my first Thai cookbook, and I was soon dabbling in making my own exotic dishes, which by now, were family favorites. You can’t imagine my delight when my brother-in-law called a few months later to say he was engaged to a Thai native—I now have a wonderful resource in May, his wife.

The recipe I want to share with you is one I created from about four or five I found on the internet but May assures me that it is authentic. I hope you’ll enjoy.

A note about special ingredients: This recipe has several ingredients that are special to Thai cooking. If you have an Asian market in your neighborhood, these ingredients should be easy to obtain. However, if you live in the Boonies as I do, not all is lost. What I usually do is buy in bulk when I’m in the “Big City” and then keep the ingredients stored in the freezer. I have also purchased them over the internet and I have listed two sites I have used with excellent results in the past. The ingredients are something of a nuisance to obtain but believe me—it is worth it!


Lemon grass—a citrus flavored grass native to India.


Galangal Root—also known as white ginger, has a unique taste but is similar in shape and texture to ginger you find in western markets. Do not substitute Ginger for Galangal Root.


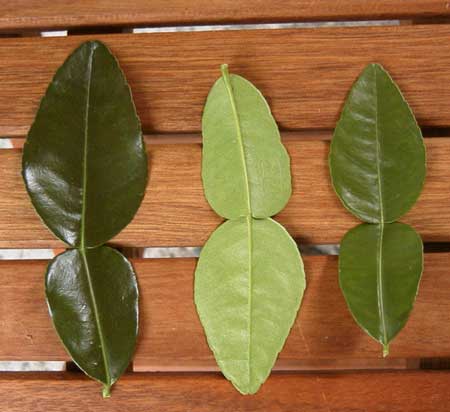
Kaffir Lime Leaves—leaves from a kaffir lime tree…they have a pungent lime/citrus flavor that is delicious. Also of interest is their unique 'double leaf' shape.


Tom Ka Gai Soup (Thai Coconut Chicken Soup)

This recipe serves about 4. I usually double it and we eat it over jasmine rice.

1 can Coconut Milk (best is Aroy-D Brand)
1 ½ can Chicken Broth
4-5 Kaffir Lime leaves-bruised to release flavor
1 inch galangal root- sliced thin
4 Tbs Fish Sauce (best is Squid brand)
4-5 pieces (2”) lemon grass- bruised. (About 2 stalks)
2 boneless skinless chicken breast. Cut into thin strips
*2 fresh Thai chili’s minced to taste for spice
1 bunch scallions, minced
2 Tbs lime juice
1 fresh tomato, chopped
1-2 cups fresh mushrooms, sliced
1 ½ t sugar-taste to see if soup needs before adding
½ cup Cilantro, chopped

Place coconut milk, chicken broth, kaffir leaves, galangal root, and lemon grass in pot and bring to a boil.

Reduce heat. Add chicken and simmer about 10 min or until chicken is cooked. Add chilies, tomato and scallion and cook additional 3 min.

Add fish sauce, lime juice, cilantro and mushrooms. Heat through. Serve immediately.


*I usually do not add the chili’s directly to the soup because the kids won’t eat 'spicy' yet. We actually like a fried chili paste added individually to each bowl. This allows each individual to adjust the spice to his or her own taste. The spice is necessary…the soup is bland without it.

If you do find this brand at your local Asian market….beware! Fiery would be an understatement! A little bit goes a long way...but it is delicious.


Web Sites for Ingredients: http://www.importfoods.com/ or here http://www.amazon.com/


Photo’s of Kaffir leaves, Lemongrass, and Galangal Root snagged from: http://www.fengshui-connection.com/images/KaffirLimeLeaves.jpg
http://www.dkimages.com/discover/previews/798/25095210.JPG
http://www.sacatomato.com/lemongrass.jpg
Related Posts Plugin for WordPress, Blogger...