Sunday, July 10, 2011

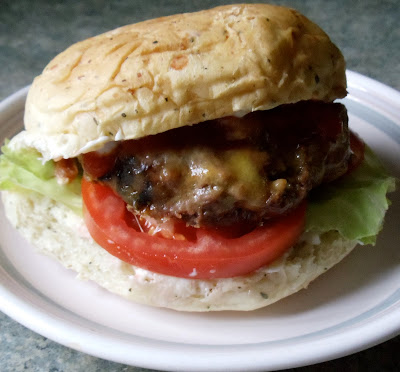
Dave Giffin’s Killer Jalapeno Bacon Hamburgers


It is finally warming up here in the Northwest and I’m loving it! Time to dust off my favorite summer recipes, shut up the house, and do all my cooking on the grill. Summer, in my mind, is the time for hamburgers—freshly cooked, outside, with bits of charcoal mixing with the juiciness of the burger. If you add in baked beans and some potato salad…what could be better?

For years, I made my burgers pretty much the same way every year—burger, a bit of finely chopped onion, salt and ground pepper, and sometimes a little garlic powder. Then I met Dave and it goes without saying that my burgers will never be the same again!

Before I share his recipe, which he graciously gave me permission to do, let me tell you a bit about him. Dave is one of those extraordinary individuals, people like me dream of meeting. A kitchen kindred spirit…a dump cook…a guy who dreams up recipes and rattles them off the top of his head…a little bit of this and a bit of that, and...Voilà! Magic! Every time I see him, he has some new recipe he is perfecting, and he’s not afraid to try things in combinations that an ordinary person wouldn’t dream of.

The following recipe yields, in my opinion, the best, most favorable burger I’ve ever tasted. Feel free to be creative with the proportions. For those of you worried about the jalapeno…don’t be. In this recipe, it adds flavor, not heat. Enjoy!

One last thing...thinking of family traditions and hamburgers, I'm reminded that my grandfather ate peanut butter on his burgers. I'm curious, what's the strangest thing you've ever eaten on a hamburger?


Dave Giffin’s Killer Jalapeno Bacon Hamburgers

2-4 jalapeno peppers—seeded and deveined
4-5 cloves of garlic
2 lbs burger (your choice of kind, [grins] living in N. Idaho, we use ½ elk-½ beef)
1-2 lbs of bacon—cooked crisp
½-1 onion
salt and pepper

Instructions:
Pulse peppers, garlic, bacon, and onion in a food processor until you have a fine dice. Mix into burger, and add salt and pepper. Form into patties and grill. Serve with the usual hamburger condiments of buns, lettuce, tomato, relish, ketchup, and mustard.

Variation: If you like cheese with your burgers, try adding 1+ cup of sharp cheddar, jack, or crumbled blue cheese to burger before forming into patties.
Tuesday, July 5, 2011

Quick and Easy Gourmet Espresso Brownies


Pressed for time? Have an unexpected invitation to dinner or a potluck and don’t know what dish to bring? Need a quick dessert that is easy and made with things you probably have in your kitchen?

Well, if you’re like me, you have this problem on a regular basis.

This week at work, we held a going away party for a colleague who is leaving and because I work 12-hour shifts, I had very little time to prepare anything elaborate. Enter my trusty standby—Cheater Brownies—box base with a few gourmet additions. This classic dump-cooking favorite is versatile and virtually fool proof… and not only that, it gets rave review from young and old alike. Enjoy!

Gourmet Espresso Brownies
(makes 12-16 brownies)

1 box Ghirardelli Triple Chocolate Brownie Mix
1 egg
1/3 C oil
1/3 C water
½ package chocolate chips
2 Tbs espresso powder (buy or grind your own from whole beans)
Chocolate covered espresso beans
Powdered sugar
Hot Fudge (Mrs. Richardson’s Hot fudge is my favorite)

Kitchen notes: I use the Ghirardelli Triple Chocolate Brownie Mix and best quality milk-chocolate chips (Ghirardelli or Guittard), because I’ve had great results and because Ghirardelli and Guittard products are given high marks by the Cook’s Illustrated test kitchen. In a pinch, use whatever you have handy.

Instructions: Mix brownies as per instructions on the back of the package. Add in the extra ingredients before adding the liquids. Line baking dish with parchment paper to allow lifting the brownies from the pan when cool. Bake according to directions on package. Cool in pan until completely cool (overnight, covered with a tea towel, is good). Lift from pan and cut into squares. Garnish with powdered sugar sprinkled through a sieve or shaker. Pipe a dot of hot fudge onto the middle of each brownie and top with chocolate covered espresso bean.

Variations: If espresso brownies aren't your thing, here are a couple of other ideas. Leave out the espresso powder and try these substitutions instead.

Minty—add ½ teaspoon peppermint flavoring to batter or substitute 2 T of peppermint schnapps, for 2 T of water. Garnish with crushed peppermint candies, or mint leaves and a mint flavored Hershey’s Kiss.

Caramel—substitute 2 T of spiced rum, for 2 T of water. Garnish with melted caramels drizzled over the brownies.

Alternatively, if you just want a pretty brownie, consider these garnishes.
·         Fresh berries
·         White chocolate curls
·         Candied nuts
·         Whipped cream with a cherry
·         Candied Sprinkles
·         Andes Mint Curls
·         Candied Fruit
Go here for a cool website with lots of other ideas for garnishing.


Sunday, April 3, 2011

Sahlep, Saf Sahlep


Sunny days are glorious aren’t they? Today it looks like spring is going to give us a few hours of sunshine. I have kicked everyone out of the house and am sitting here in peace with a steaming cup of Sahlep in my hands. What is that you ask…?

Pure delight in a cup.

Sahlep is a creamy, milk based drink that is served during the winter months in countries surrounding the Mediterranean. Think cocoa without the chocolate…hard I know. I discovered it on a recent trip to Istanbul where they served it in delicate little cups every morning in the lobby of our hotel. I was completely addicted with the first sip and it will forever embody the essence of Istanbul for me. 

Delicate and flowery, Sahlep is made from the dried tubers of a mountain orchid. The tubers are ground to a fine powder, which when mixed with milk and sugar, and sprinkled with cinnamon, yields a delicious beverage. Unfortunately, because of the popularity of the drink, the orchid is now considered endangered and export of the powder is banned, making it very hard to obtain here in the United States. 

Having discovered it, however, I couldn't bear the thought of not bringing some home. Braving the crowds of Istanbul’s Spice Market, I dragged my husband on a search for Sahlep powder. Success came at the price of my pocketbook, but I think I’d pay almost any price for the yumminess in the cup in front of me.

Teşekkür ederim, Turkey! (Thank-you!)


Sahlep (Makes 6 servings)
4 cups (1 liter) milk
2-3 tsp. pure saf sahlep powder
2-3 Tbs. sugar (to taste)
Cinnamon for garnish
Ground pistachio nuts (optional)


Directions:
Combine the sugar and sahlep powder in a medium saucepan and mix. Slowly add the milk stirring constantly to prevent lumps. Cook over low heat, stirring constantly, until mixture is slightly thickened. Remove from heat and pour into demitasse cups or small mugs. Sprinkle with cinnamon and pistachio nuts.


If you can get your hands on some Sahlep powder you are in for a treat. I was able to find the powder here, but I don’t know if they are a reliable supplier.

Here also, but this is the instant powder, which I was told is not as good.


Also, here are a couple of Sahlep links I found interesting.
Anissa's...a cool picture of salep in the raw 
In Transit

All links good: 7 January 2012

Sunday, March 6, 2011

Baking Craze Cont...

Now for the bread…

My story starts with too much oatmeal. I’d made extra because there was only half a cup left in the package, and for all the work involved you can’t just leave half a cup in the package, so I cooked it. Normally I’d just throw the leftovers in the fridge knowing someone would want a snack—(oatmeal, as I think I’ve mentioned doesn’t last very long at my house) but that day I was in the mood to bake.
So, I picked up the phone for a chat with Nana.

Now, before I tell you about that conversation however, you need to know that Nana is an amazing baker. Every week she bakes me 3 loaves of the most amazing whole wheat bread. Talk about spoiled, huh? She also bakes amazing rolls, pies, buns, cinnamon rolls and myriad of other things too numerous to list. Anyway…for the past several years I’ve gone on baking kicks, always trying to make my bread turn out as good hers…and of course….ending with varying degrees of success.

“What would happen if I tried to make bread with some of this leftover oatmeal?” I asked her.
Her reply was immediate. It would be great, and she used to make oatmeal bread all the time when I was little. (I don’t remember that…my memories are of ‘healthy’ whole wheat bread, but I’ll take her word for it.) Then she rattles off a recipe from memory while I frantically scribble down ingredients and measurements.

“Add some raisins and make cinnamon-raisin swirl bread,” she suggested. Then said, “after you add the cinnamon, mist it with a little water so it sticks together better”…and “a little sugar sprinkled on the cinnamon is nice”….and “let me know how it turns out, Honey.” I hang up the phone, shaking my head. OMG! Amazing.

And believe me it was…which is why I wanted to share it with you. I hope you’ll enjoy!

Oatmeal Raisin Cinnamon Swirl Bread
Makes 2 loaves

2 cups               water—warm (115 degree F or so)
¾ - 1 cup         cooked steel cut or Scottish Oatmeal—cooked
3 Tbs                 brown Sugar
3 Tbs                 butter (or 1 ½ Tbs butter and 1 ½ Tbs Shortening
                                          to extend shelf life)
5 tsp                   active dry yeast
5-6 cups            flour
2 cups                raisins
1 tsp                   salt

2 Tbs                  oil (for coating bread bowl)

2-3+ Tbs           cinnamon
1-2 Tbs              white sugar

Bottle with water for misting

Directions:

I usually use the dough cycle of my bread machine for this recipe but you could use a KitchenAid mixer with a dough hook or make by hand.

Place the water, oatmeal, brown sugar, butter, flour, yeast, and salt in the pan of your bread machine in the order recommended by the manufacturer. Select the dough cycle and press start.
(If making without a bread machine, you may consider proofing the yeast in part of the warm water with some of the brown sugar before combining with the flour and oatmeal)

Keep an eye on your dough and add more flour if needed. About 5 minutes before the end of the kneading cycle add the raisins.

Pour oil into large bowl. Remove dough from pan and place in oiled bowl. Coat dough with oil and cover with plastic wrap. Allow bread to rise until almost doubled (30-45 minutes.)

Prepare loaf pans by spraying with no-stick cooking spray.

Preheat oven to 350 degrees (175 C).

After dough has risen, punch down and pat dough into a large rectangle (about 1-inch thick) and sprinkle with cinnamon. Mist with water, and sprinkle on the white sugar. Roll dough into a 'log' and pinch edges closed.

Cut the ‘log’ in half and shape into a loaves.

Place into prepared loaf pans. Cover with plastic wrap and allow to rise additional 30 minutes or until nicely risen above the loaf pans.

Bake for 30-40 minutes or until nicely brown.

Remove from loaf pans and brush top of loaves with butter.

This bread makes awesome toast. 

Friday, February 11, 2011

Winter Comfort and Italian Sweet Cream


What do you make for breakfast that just comforts the soul?

At my house, it’s oatmeal.

During my growing up years, I didn’t have oatmeal often because my dad—who usually made our breakfasts (Mama worked swing shifts and didn’t get up in the mornings before we went to school) wasn’t overly fond of the mushy, gummy mess that posed for breakfast as his mother had made it. (Instead, he was a master of scrambled eggs cooked in the microwave. Sounds gross, I know but somehow they always turned out fluffy and delicious.)

When I was in college, I dated a man who taught me to make oatmeal (and triticale—his favorite) with nothing more than boiling water and time. It was quick and tasty and that was how I made oatmeal until about a year ago, when I stumbled upon a recipe for Irish or steel cut oatmeal. Wow! What a delightful find…we were immediately hooked. Even my “I don’t eat mush!” husband fell in love.

Our favorite way to eat steel cut oats is with a little Italian Sweet Cream and a dollop of raspberry or strawberry freezer jam. Frozen huckleberries and slivered almonds with brown sugar are also good. I usually make extra because they heat up easily in the microwave for a quick and tasty breakfast when you’re in a rush and they never last long in the refrigerator…someone always wants a snack.


I have to confess to an ulterior motive for sharing this recipe now. Recently, I’ve been on a baking kick and I’ve been using leftover oatmeal in a fun and simple oatmeal raisin-cinnamon swirl bread. Stay tuned for further recipe postings. J


Note: this recipe is great for both steel cut oats and Scottish oatmeal.  What’s the difference? Scottish oats are stone ground into a medium fine meal while steel cut or Irish oats have the oat groat cut into two or three pieces. I toast them both before cooking and the finished product is very similar. The Scottish oats cook in about 10 minutes while the steel cut oats take 40-50 minutes depending on how soft you like them.

Irish Oatmeal

1 cups Irish or steel cut oats—may also be called pinhead oats
1 Tbs butter
pinch salt
3-4 cups boiling water

Instructions:
Melt butter in saucepan over medium heat. Add oats and roast for 3-5 minutes, stirring constantly, until oats are toasty brown. Remove from heat and carefully add boiling water (it will spit and boil up a bit). Cook on low heat, stirring every 5-10 minutes (to prevent sticking) until oats are soft. Enjoy with toppings of your choice.

Italian Sweet Cream

This is pure decadence in a bottle and definitely not meant to be eaten on a daily basis. J (I haven’t tried it but I’m sure you could make something similar with fat free half-and-half.)

1 pint heavy whipping cream
1 cup sugar (more or less to taste)
½ tsp vanilla (optional)

Stir all ingredients gently until sugar dissolves. Place in glass jar or bottle. Serve over hot oatmeal. 


Monday, February 7, 2011

Snickerdoodles!


Now for my current baking craze. Do you ever get these?

I’ve been on one—bread mainly (more on that soon), but cookies too. It strikes me that it’s been a long time since I posted any cookie recipes and so today, I thought I’d share the family Snickerdoodle recipe.

These crinkly topped cookies have been always been one of my favorites. Nana would let my brother and I help her make them when we were kids. It was great fun. Who wouldn’t love rolling dough into balls through a sandbox of cinnamon sugar, then licking the extra off your fingers? It was much more fun than play dough!

At my house, they MUST be made in the traditional fashion with cream of tarter and baking soda. No modern variations for us…

Spicy, sweet and crispy tender, you’ll find it impossible to eat just one.

Snickerdoodles
Makes about 5 dozen—don’t worry, they freeze beautifully.

1 cup     butter
1 cup     margarine or shortening
3 cups    sugar
4            eggs
2 tsp.     vanilla
4 tsp.     cream of tarter
5 1/3      flour
2 tsp.     baking soda
½ tsp.    salt
1 cup     cinnamon sugar

Directions:
Preheat oven to 375 degrees.

Beat butter, margarine, and sugar until fluffy, add in eggs one at a time, beating until each is thoroughly incorporated.

In a separate bowl combine dry ingredients.

Add dry ingredients to butter and sugar mixture—mixing until all dry ingredients are moistened.
Form dough into balls and roll in cinnamon sugar.

Bake for 8-10 minutes.

Cookies will look a little under-baked. Remove from oven and allow to cool for a few minutes on the baking sheet before moving to cooling rack.


Sunday, September 5, 2010

Fresh and/or Roasted Tomato Cappellini


I have tomatoes! This year’s rainy spring and late frost pushed my tomatoes back by about 3 weeks and I have been anxiously waiting and watching for them to ripen. Why? Because there is nothing better than a fresh tomato eaten straight from the garden. Or on a sandwich with crispy lettuce, or with my favorite pesto on pasta. Or…or…or…I could go on forever.

However, eventually there comes a time at the end of summer (not yet…), when all the tomatoes seem to ripen at the same time and I’m inundated with way too many.

And a sandwich doesn’t sound good…

And I don’t feel ambitious enough to can them…

And I’m tired of salad, and I don’t feel like making sauce…

And I’m thinking I planted way too many plants, and next year I’ll remember this and do better.

What exactly do you do with all those cherry tomatoes anyway?

You make Cappellini, and invite your friends or family for dinner.

This recipe chases all my grumpies away… It uses lots of tomatoes. It is very easy to make, feeds lots of people, and is a great recipe for use with both fresh and/or roasted tomatoes. Roasting the cherry tomatoes caramelizes the sugars and gives a delightful smoky flavor to the pasta. Fresh tomatoes give a sweet lemony flavor. Try this dish both ways and then mix the roasted and fresh for an entirely different flavor. Each way is unique and equally wonderful.

Best of all, when I make this…and close my eyes to appreciate the flavors of tomato, garlic, and basil…I fall in love all over again.

And I vow to plant just as many plants, if not more, next year.

Fresh and/or Roasted Tomato Cappellini
Serves 6-8
(as always...amounts in recipes are approximate...feel free to be creative)

1 medium onion—minced
4-5 cloves garlic—minced fine or crushed
1-2 Tbs olive oil, plus more if roasting tomatoes
4-6 cups fresh tomatoes—diced or if using cherry tomatoes, roasted
½ cup fresh basil—chiffonade
2 Tbs fresh parsley—minced
1-2 Tbs balsamic vinegar or lemon juice (see note below)
¼ - ½ tsp red pepper flakes
1 cup freshly grated parmesan and or Romano cheese
1 lb angel hair pasta—cooked al dente
Salt and fresh ground pepper to taste

Directions:
Cook pasta as per directions on package

Sauté onion and garlic in olive oil. Add fresh or roasted tomatoes and cook over medium heat for an additional 5-10 minutes. Add balsamic vinegar, red pepper flakes, parsley, and basil and stir to wilt herbs (about 1 minute). Salt and pepper to taste. Toss with pasta and add cheese. Serve immediately.

For Roasting: Place tomatoes on parchment or no-stick tinfoil. Drizzle olive oil over and sprinkle with salt and pepper. Roast in 450 degree oven for about 15 to 20 minutes or until they look like the picture below.


Sauté onion and garlic in olive oil.

Add roasted tomatoes...

Alway use fresh herbs if possible...

This batch we mixed the roasted tomatoes with fresh. Toss with pasta...yum!

A note about tomatoes: There are many varieties of heirloom tomatoes available in home gardens and farmers markets and I encourage you to try them all. Yellow varieties have a wonderful citrus flavor that is not to be missed. When we make this recipe with fresh and especially the yellow varieties, we use lemon juice instead of balsamic vinegar for the brightness of flavors it yields. With the roasted tomatoes, balsamic vinegar seems to yield the better dish. Play around and let me know what works for you.
Related Posts Plugin for WordPress, Blogger...